Vanilla Beans Growing: Essential Tips & Techniques for Successful Home Cultivation

Growing vanilla plants at home can be a challenging yet rewarding experience for those who love the aromatic and flavorful beans. Vanilla plants are tropical vines that require a warm and humid environment to thrive, making them a perfect addition to indoor grow tents or herb gardens with filtered light and consistent moisture.
Vanilla planifolia is the most commonly grown species of vanilla plant, known for its distinct taste and scent. It can take up to 3-5 years for vanilla plants to produce flowers and beans but once established, they can continue to grow and produce for decades.
If you’re interested in growing vanilla beans indoors, there are several things you need to consider. First, you’ll need to provide your plant with enough light. Vanilla plants prefer bright, indirect sunlight but too much direct sun can scorch their leaves. A grow tent with LED lights or fluorescent bulbs is an excellent option if you don’t have access to natural light.
Secondly, humidity levels are crucial when growing vanilla beans. The ideal range is between 70% – 85%, which may be difficult to achieve in some climates. However, using a humidifier or placing a tray of water near your plant can help maintain adequate moisture levels.
For those looking for an alternative method of growing vanilla beans at home, hydroponics may be an option worth exploring. Hydroponic systems allow you to grow plants without soil by providing all necessary nutrients through water solutions. This method ensures that your plant receives optimal nutrition while reducing the risk of pests and diseases.

So what exactly is a vanilla plant? Vanilla plants belong to the orchid family and are native to Mexico and Central America. They were first cultivated by the Aztecs who used them as flavorings in their chocolate beverages. Today, Madagascar is the largest producer of vanilla beans followed by Indonesia and Tahiti.
If you’re new to growing vanilla beans at home, resources such as the wikiHow website offer step-by-step guides on how to get started. From pollination techniques to harvesting tips, these guides provide valuable information for both novice and experienced growers.
Timing is everything. Beans should be harvested when they turn lightly brown and split in half. This process can take up to 9 months from pollination, so patience is key.
Understanding the Vanilla Orchid and Its Role in Growing Vanilla Beans
Vanilla orchids are fascinating plants that require specific conditions to grow and produce the delicious vanilla beans we know and love. Let’s take a closer look at these unique vines and their role in the world of vanilla bean production.
The Vanilla Orchid: A Vine-Like Wonder
As a member of the orchid family, the vanilla orchid is a vine-like plant that grows best in warm temperatures, high humidity, and filtered sunlight. These delicate plants produce beautiful flowers that only bloom for a few hours each day. In order to produce vanilla beans, these flowers must be pollinated by hand – a labor-intensive process that requires skilled workers to carefully transfer pollen from one flower to another.
Growing Vanilla Beans: A Time-Intensive Process
Once pollination has occurred, it can take up to three years for vanilla orchids to mature and begin producing beans. Throughout this time, growers must carefully tend to their plants, ensuring they receive the right amount of water, nutrients, and light. This process requires patience and dedication – but the end result is worth it!
Species Matters: The Importance of Choosing the Right Vanilla Orchid
There are over 100 different species of vanilla orchids – but only a few are used for commercial vanilla bean production. The quality and flavor of these beans can vary greatly depending on which species is used, as well as the growing conditions and harvesting methods employed. For example, Madagascar Bourbon vanilla beans are known for their rich flavor profile – while Tahitian vanilla beans have a more delicate taste.

Choosing the Right Location and Environment for Vanilla Beans Growing
Ideal Location and Environment for Vanilla Beans Growing
Tropical Climate: The Key to Successful Vanilla Beans Growing
Vanilla beans are a highly sought-after ingredient in the food industry, with its unique flavor and aroma that can enhance various dishes. However, growing vanilla beans is not an easy feat. One of the most crucial factors to consider when planting vanilla beans is the climate. Vanilla plants thrive in warm, humid environments with temperatures ranging from 20-30°C (68-86°F). Therefore, it’s essential to choose a location that provides these conditions to ensure successful growth.
Sun Exposure: Providing Enough Light for Optimal Growth
Another critical factor in choosing the ideal location for growing vanilla beans is sun exposure. Vanilla plants require ample sunlight to grow properly. The ideal place should have plenty of sun exposure throughout the day, but it’s also important to provide some shade during the hottest part of the day. This balance will help prevent scorching of leaves and flowers while still providing enough light for optimal growth.
Protection from Strong Winds and Heavy Rainfall: Keeping Your Plants Safe
Vanilla plants are delicate and vulnerable to damage caused by strong winds and heavy rainfall. Therefore, it’s crucial to choose a location that provides protection from these elements. Areas with natural windbreaks such as trees or hillsides can be helpful in shielding your plants from strong winds. Using landscape fabric can help protect your plants from heavy rainfall while maintaining a consistent environment.

Maintaining Pest-Free Environment: Ensuring Healthy Growth
Pests and diseases can cause significant damage to vanilla plants, resulting in stunted growth or even death. To prevent this from happening, you must keep your environment free from pests and diseases that could harm your crops. Regularly inspecting your plants for any signs of infestation or disease is essential in catching any issues early on before they become severe.
Planting Vanilla Beans: Step-by-Step Instructions for Success
Preparing the Soil: Mix Peat Moss for Optimal Drainage and Moisture Retention
One of the most important steps in planting vanilla beans is to prepare the soil properly. Vanilla bean plants require a warm and humid environment to thrive, so it’s crucial to ensure that the soil has proper drainage and moisture retention.
To achieve this, it’s recommended to mix peat moss into the soil before planting. Peat moss is an organic material that helps improve soil structure by increasing water-holding capacity and improving aeration. It also provides essential nutrients for plant growth.
When mixing peat moss into the soil, it’s important to do so thoroughly, ensuring that it’s evenly distributed throughout. This will help create a consistent growing environment for the vanilla bean plants.
Selecting Healthy Plants: Look for Strong Roots and Leaves
Another critical step in planting vanilla beans is selecting healthy plants. When choosing plants, look for those with strong roots and leaves. Weak or damaged roots can lead to poor growth or even death of the plant.
It’s also important to select plants that are disease-free, as diseases can quickly spread among plants in close proximity. If possible, choose plants from reputable nurseries or suppliers who can provide information on their growing conditions and history.
Providing Proper Support: Use Trellises or Stakes
Vanilla bean plants are climbing vines that require support as they grow. Without proper support, they may become tangled or damaged, leading to stunted growth or reduced yields.
To provide support for vanilla bean plants, use trellises or stakes. Trellises are typically made of wood or metal and consist of horizontal bars spaced several inches apart. As the vine grows, it can be trained along these bars using clips or ties.
Stakes are another option for supporting vanilla bean plants. They should be placed near the base of each plant and secured firmly in place with twine or wire as needed.
Following Step-by-Step Instructions: Utilize Reliable Sources Such as Wikihow
While planting vanilla beans may seem daunting, following step-by-step instructions can increase the chances of success. There are many resources available online, including articles and videos that provide detailed instructions on planting and caring for vanilla bean plants.
One reliable source of information is Wikihow, which offers a comprehensive guide to growing vanilla beans. Their step-by-step instructions cover everything from preparing the soil to harvesting the beans and can be a valuable resource for both novice and experienced growers.
With proper care and attention, vanilla bean plants can produce high-quality beans for years to come. By preparing the soil properly, selecting healthy plants, providing proper support, and following step-by-step instructions from reliable sources such as Wikihow, you can increase your chances of success in growing these delicious fruits.
Caring for Your Vanilla Orchid Plants: Water, Humidity, and Other Factors
Watering, Humidity, and Other Factors for Caring for Your Vanilla Orchid Plants
Caring for vanilla orchid plants can be a rewarding experience, but it requires patience and attention to detail. These delicate plants require specific conditions to thrive, including proper watering, high humidity levels, and indirect sunlight. In this section, we will discuss the key factors involved in caring for your vanilla orchids.
Watering
One of the most critical aspects of caring for vanilla orchid plants is proper watering. Overwatering can lead to root rot and other issues that can harm the plant’s health. To avoid overwatering your orchids, water them regularly but do not let the soil become too wet or too dry. A good rule of thumb is to water your orchids once a week during the growing season and reduce watering in winter when growth slows down.
Humidity
Vanilla orchids thrive in high humidity environments, so it is essential to maintain adequate moisture levels around the plant. You can increase humidity by misting your orchids daily with a spray bottle or placing a tray of water near the plant. Another option is to use a humidifier near your orchids if you live in an area with low humidity levels.
Sunlight
Vanilla orchids need indirect sunlight for 4-6 hours per day to grow properly. Direct sunlight can scorch their leaves and cause damage to their delicate structure. If you are growing your orchids indoors, place them near a window that receives bright but filtered light throughout the day.
Soil
Choosing well-draining soil is crucial when caring for vanilla orchid plants as they are susceptible to mold growth if exposed to excessive moisture. The ideal soil mix should be loose enough to allow air circulation while retaining enough moisture for healthy growth.
Patience
Caring for vanilla orchid plants requires patience as it can take several years before they produce flowers and beans. It is essential to provide consistent care and attention to your orchids during this time, including regular watering, humidity control, and proper sunlight exposure.
Storage
If you are lucky enough to harvest vanilla beans from your orchids, it is crucial to store them correctly. Vanilla beans should be stored in an airtight container away from light and air exposure as they can lose their flavor and aroma quickly. You can also freeze your vanilla beans for long-term storage.
Pollinating Vanilla Flowers: Techniques and Tips for Best Results
Pollination is a crucial step in the vanilla bean growing process that determines the quality and quantity of beans produced. The vanilla plant’s flowers only bloom for a few hours each day, so it’s important to be prepared to pollinate them as soon as they open.
Using a small paintbrush or cotton swab is an effective technique for pollinating vanilla flowers. Gently transfer pollen from the anther to the stigma while being careful not to damage the flower. This method ensures that each flower receives enough pollen, which results in higher yields of quality beans.
Another popular method for pollinating vanilla flowers is using a spray bottle filled with water to mist the flowers. This technique can help stimulate pollination by replicating natural conditions where rain would fall on the plant, increasing yield.
It’s crucial to understand that vanilla plants are generally self-incompatible, meaning they require cross-pollination between different plants to produce fruit. Growers must ensure there are enough bees and other insects in their fields or greenhouses during blooming season; otherwise, they may need to manually pollinate their plants.
When manually pollinating vanilla plants, it’s essential to be gentle and avoid damaging any part of the flower. Growers should also ensure that they use sterilized tools when transferring pollen from one plant to another or risk introducing diseases that can harm their crops.
Harvesting and Maturing Vanilla Pods: Timing and Methods
Vanilla pods are the fruit of the vanilla orchid, which is native to Mexico but now grown in many parts of the world. The pods contain tiny black seeds that are used to flavor a variety of foods, including ice cream, baked goods, and beverages. Harvesting and maturing vanilla pods is a time-consuming process that requires patience and attention to detail.
Harvesting Vanilla Pods
The timing of vanilla pod harvesting is crucial to ensure maximum flavor development. Vanilla pods should be harvested when they reach their full size and turn yellowish-green in color. This indicates that they are fully mature and ready for picking.
The best time to harvest vanilla pods is during the morning hours when the dew has dried off. This helps prevent damage to the delicate pods during handling. Careful handling is essential because any bruising or cracking can cause the pod to spoil quickly.
Harvesting of vanilla pods usually takes place after 8-9 months of pollination. It’s important not to harvest too early or too late as this can affect both quality and yield. If harvested too early, the pod will not have developed its full flavor potential. On the other hand, if left on the vine for too long, it may become overripe and split open.
Maturing Vanilla Pods
Once harvested, vanilla pods are matured for several months to develop their characteristic aroma and flavor. The maturation process involves a series of steps designed to enhance flavor development while preventing spoilage.
The first step in maturing vanilla pods is called sweating or blanching. This involves exposing them to high temperatures for a short period of time (usually around 60°C) before wrapping them tightly in blankets or towels overnight. Sweating helps break down cell walls within the pod, releasing enzymes that contribute to flavor development.
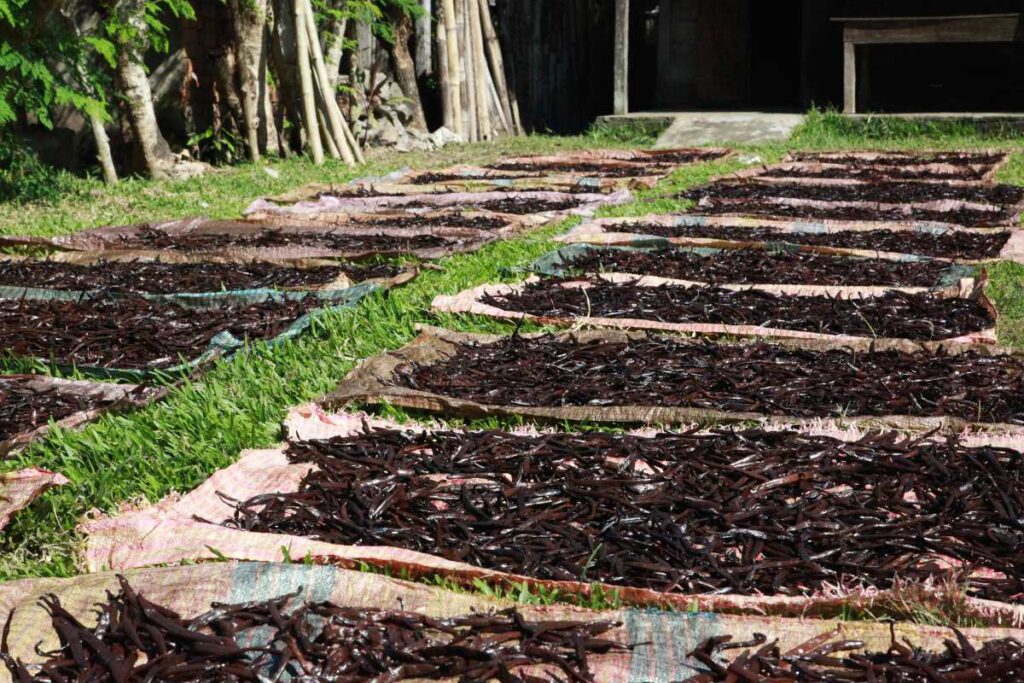
After sweating, vanilla pods are typically dried in the sun for a few hours each day. This helps reduce moisture content and prevent mold growth. Drying is followed by a period of resting, during which the pods are stored in a cool, dark place for several months to allow further flavor development.
The final step in maturing vanilla pods is called conditioning. This involves placing them in sealed containers with moist cloths or paper towels to help maintain humidity levels while preventing spoilage. Conditioning can take several weeks or even months depending on the desired level of flavor development.
Vertical Column Cultivation: A Unique Approach to Growing Vanilla Beans
Vanilla beans are one of the most sought-after spices in the world, with their unique flavor and aroma making them a favorite among chefs and food enthusiasts. While vanilla bean plantations have traditionally been grown horizontally on trellises or shade trees, there is a new approach that is gaining popularity: vertical column cultivation. In this method, containers are used to support the vines, allowing for more efficient use of space and easier maintenance.
Efficient Use of Space
One of the main advantages of vertical column cultivation is its ability to maximize space utilization. With traditional horizontal methods, only one or two plants can be grown per square meter. However, with vertical column cultivation, multiple plants can be grown in a small area by stacking containers on top of each other. This allows for higher yields and better profitability for farmers.
Container Requirements
To successfully grow vanilla beans using vertical column cultivation, it is important to choose the right container. The container should be at least 12 inches deep and wide enough to accommodate the vines as they grow. A dark brown color is recommended as it will retain heat better than lighter colors which could result in root damage from overheating.
Growing Medium
The medium used for growing vanilla beans in a container should consist of soil mixed with sand and compost. The pH range should be between 4.5-5.5 which creates an ideal environment for the growth of vanilla beans.
Planting Method
When planting vanilla beans using vertical column cultivation method, it’s essential that you start by planting them at the bottom of your container then supporting them with stem or bamboo pole as they grow taller up towards the top layers of your potting mix (medium). It’s also essential that you cover your plants with blanket or leaves at the top layer to provide shade from direct sunlight which could burn out your crops.
Farming Vanilla as a Business: An Overview of Commercial Cultivation Methods
Varieties of Vanilla for Commercial Cultivation
Commercial cultivation of vanilla can be a profitable business, with various varieties available for cultivation. The most common type is Bourbon vanilla, which is grown in Madagascar and other African countries. Other varieties include Mexican, Tahitian, and Indonesian vanilla. Each variety has its unique flavor profile and aroma, making them suitable for different culinary applications.
Researching the Best Methods for Growing Vanilla
Research is crucial in determining the best methods for growing vanilla commercially. Factors to consider include soil quality, climate conditions, and pest control measures. One popular method involves using fertilizers to enhance the growth of vanilla plants. Another method involves using fabric for shade to protect the plants from harsh sunlight.
Propagating Vanilla Plants through Cuttings
Vanilla plants are propagated through cuttings from mature vines that have already produced fruit. These cuttings are then planted in an area with suitable soil and climate conditions. It takes about six months for the cuttings to grow into a mature vine that can produce fruit.
Obtaining Rights to Use Copyrighted Images and Text Content
Commercial cultivation of vanilla requires obtaining rights to use copyrighted images and text content related to vanilla farming. This can be done through purchase or consent from the copyright holder. Entities using images or text content related to vanilla farming should be aware of international copyright laws and consider using a Creative Commons license for their own use.
The Process of Growing Vanilla
The process of growing vanilla can take up to three years before it produces any harvestable fruit. During this time, the plant needs constant care and attention, including regular watering, pruning, and pest control measures. The first harvest occurs after 600-700 days when the flowers bloom on the plant’s vine.
Tips and Tricks for Mastering the Art of Growing Vanilla Beans
Growing vanilla beans is a rewarding experience that requires patience, knowledge, and dedication. Whether you are a beginner or an experienced grower, there are always tips and tricks to improve your crop yield and quality.
Firstly, it’s essential to choose the right location for your vanilla orchids. They thrive in warm, humid climates with filtered sunlight. A slightly acidic soil with good drainage is also crucial for their growth. Vertical column cultivation is another unique approach that maximizes space and increases productivity.
Once you have planted your vanilla beans, proper care is necessary for them to flourish. Watering should be regular but not excessive as too much water can cause root rot. Humidity levels should be maintained at around 80%, which can be achieved by misting or using a humidifier. Fertilizers rich in nitrogen, phosphorus, and potassium can promote healthy growth.
Pollinating vanilla flowers by hand is a delicate process that requires precision and attention to detail. It involves removing the male parts of the flower before transferring pollen from the male to female parts using a toothpick or similar tool.
Harvesting vanilla pods requires careful timing as they need to mature on the vine before being picked when they turn yellow-green in color. The curing process involves blanching them in hot water before drying them in the sun or oven until they become dark brown and fragrant.
Farming vanilla as a business can be profitable if done correctly. Commercial cultivation methods involve large-scale production using modern technology such as greenhouses and irrigation systems.