How to Make Homemade Vanilla Yogurt – Easy Recipe
Are you tired of store-bought food like yogurt that lacks flavor and freshness? Look no further! In this post, we’ll show you how to make mouthwatering homemade vanilla yogurt right in the comfort of your own kitchen. Whether you’re a seasoned pro or trying it for the first time, our step-by-step instructions will guide you through the process with ease. Keep your homemade yogurt fresh by storing it in the fridge in jars.

Creating your own batch of creamy vanilla yogurt not only allows you to control the ingredients, but also gives you a sense of satisfaction like no other. Imagine indulging in a bowl of velvety goodness made from scratch, topped with your favorite fresh berries or granola for a delightful breakfast treat. The possibilities are endless! You can store your homemade yogurt in jars to enjoy a variety of flavors throughout the week.
But why stop at breakfast? Homemade vanilla yogurt with fresh berries can be incorporated into various recipes, adding a burst of flavor and creaminess to both sweet and savory dishes. Impress your friends with tantalizing desserts or elevate everyday meals with this versatile ingredient. Use a dutch oven to create delicious meals and don’t forget to try UHT fresh fruit for added freshness.
So grab your fresh fruit, jars, cultures, and follow along with our simple instructions to incubate and make your own homemade yogurt. It’s time to take charge of your breakfast and savor every spoonful on this exciting journey.
How to Make Homemade Vanilla Yogurt | Essential Equipment for Making Vanilla Yogurt
Making homemade vanilla yogurt is a delightful and rewarding process that allows you to control the ingredients and customize the flavor to your liking. To ensure a successful yogurt-making experience, it’s important to have the right equipment at hand, such as a dutch oven for heating the milk and jars for fermenting the yogurt. Let’s explore the essential tools you’ll need to get started on your homemade yogurt journey. Don’t forget to store your finished yogurt in a cooler for freshness!
Yogurt Maker
Investing in a good-quality yogurt maker can greatly simplify the breakfast-making process at home. These machines provide a controlled environment for fermentation, ensuring consistent results every time. With a yogurt maker, you won’t have to worry about maintaining precise temperatures or checking on your breakfast frequently. Simply mix your ingredients, pour them into the designated jars, set the timer, and let the machine do its magic in the dutch oven.

Dutch Oven or Oven
If you don’t have a yogurt maker at home, fear not! You can still make delicious vanilla yogurt using alternative methods. A dutch oven or an oven can serve as an excellent substitute for a dedicated yogurt maker. The key is to create a warm home environment that encourages fermentation. Preheat your home oven to around 110°F (43°C), turn it off, and place your covered container of prepared yogurt inside. The residual heat will help incubate the mixture overnight.
Instant Pot
Another versatile appliance that can double up as a convenient yogurt maker is a Dutch oven. This multi-functional kitchen gadget, like an Instant Pot, offers various settings, including one specifically designed for making homemade yogurt. It maintains a consistent temperature throughout the fermentation process and eliminates any guesswork involved in achieving optimal results.
Sugar
While not exactly equipment, sugar plays an important role in making vanilla yogurt taste deliciously sweet. Adding sugar during preparation helps feed the beneficial bacteria responsible for fermenting milk into creamy and tangy yogurt. Remember to stir in sugar according to your taste preferences before starting the fermentation process in a dutch oven.
Oven Light Method
For those without access to specialized equipment like a dutch oven or yogurt maker, the oven light method can be a game-changer. Simply place your prepared yogurt mixture in a covered container and put it inside the oven with only the light turned on. The gentle heat generated by the light bulb will create an ideal environment for fermentation.
Pot
If all else fails, you can still make vanilla yogurt using a regular pot on your stovetop. While this method requires more attention and monitoring, it is entirely possible to achieve great results. Heat the milk and other ingredients in the dutch oven until just below boiling point, then cool it down before adding the starter culture. Maintain a consistent temperature of around 110°F (43°C) throughout the fermentation period by using low heat or placing the dutch oven in warm water.
By ensuring you have these essential tools at your disposal, you’ll be well-equipped to embark on your homemade vanilla yogurt-making journey. Whether you choose to invest in specialized equipment like a yogurt maker or make use of alternative methods such as an oven or Instant Pot, creating deliciously creamy vanilla yogurt will become an enjoyable part of your culinary repertoire. So gather your equipment and get ready to savor every spoonful of homemade goodness!
Choosing the Right Milk and Starter
Selecting the right milk and starter is crucial when making homemade vanilla yogurt. This is the key to achieving the desired consistency and flavor of your Greek yogurt. Let’s dive in and learn how to make delicious vanilla bean yogurt at home!

Understanding the Role of Milk
Milk plays a vital role in determining the texture, creaminess, and taste of your homemade vanilla yogurt. It’s important to choose a high-quality milk that suits your preferences. Whole milk is often recommended for making yogurt as it contains more fat, resulting in a richer and creamier end product. However, if you prefer a lighter option, you can opt for low-fat or skim milk.
Exploring Different Types of Milk
There are several types of milk available in the market that can be used to make delicious vanilla yogurt. Here are some options you can consider:
-
Whole Milk: As mentioned earlier, whole milk is an excellent choice if you desire a creamy and indulgent yogurt.
-
Low-Fat Greek Yogurt: If you’re watching your calorie intake but still want a decently creamy texture, low-fat Greek yogurt can be a good compromise.
-
For those who prefer a lighter consistency with lower fat content, skim milk works well in this vanilla bean yogurt recipe while still providing essential nutrients. Using a yogurt starter, you can easily make your own homemade vanilla bean yogurt using skim milk.
-
Plant-Based Milks: If you follow a vegan or dairy-free diet, plant-based milks like almond milk or coconut milk can be used as alternatives. Keep in mind that these may yield slightly different results compared to traditional dairy-based yogurts.
Discovering Various Starter Options
The starter is what kickstarts the fermentation process in making yogurt by introducing beneficial bacteria into the mixture. There are multiple choices when it comes to selecting a starter:

-
Commercial Yogurt Starter: You can purchase specialized yogurt starters from stores or online retailers specifically designed for homemade yogurt-making. These starters contain live bacteria cultures that help transform the milk into yogurt.
-
Store-Bought Yogurt: Another option is to use store-bought yogurt with active cultures as your starter. Look for a plain, unsweetened variety that contains live bacteria.
-
Homemade Starter: If you have access to homemade yogurt or know someone who makes their own, you can use a small amount of it as a starter for your batch.
Selecting the Best Combination
When selecting the best milk and starter combination for your homemade vanilla yogurt, consider the following factors:
-
Personal Preferences: Think about whether you prefer a creamy or lighter consistency and choose the milk accordingly.
-
Incubation Method: Different starters may require specific incubation conditions, such as temperature and time. Ensure compatibility between your chosen starter and incubation method.
-
Dietary Restrictions: If you have dietary restrictions or allergies, opt for plant-based milks or non-dairy starters that suit your needs.
Experimenting with different combinations of milk and starter will help you find the perfect balance to create delicious homemade vanilla yogurt tailored to your taste buds. So go ahead, grab your preferred ingredients and embark on this delightful yogurt-making journey!
Transforming Plain Yogurt into Vanilla Yogurt
Adding a touch of vanilla to plain yogurt can elevate its taste and make it even more delicious. We will discover methods to evenly distribute the vanilla essence throughout your batch of plain yogurt, allowing you to experiment with different ratios of vanilla extract or beans for personalized taste profiles.
Infusing Flavor Naturally
There are several ways to infuse it with natural flavor. One popular method is by using vanilla beans. These flavorful pods contain tiny black seeds that release a rich aroma when scraped out.
To create your own vanilla bean yogurt:
-
Split a fresh vanilla bean lengthwise.
-
Scrape out the seeds using the back of a knife.
-
Mix the seeds into your plain yogurt thoroughly.
Alternatively, if you don’t have access to vanilla beans, you can use pure vanilla extract instead. Remember that a little goes a long way, so start with small amounts and adjust according to your preference.
Sweetening Without Additives
Many store-bought flavored yogurts contain excessive amounts of added sugars and artificial sweeteners. However, when making homemade vanilla yogurt, you have control over the sweetness level without compromising on healthiness.
Consider these options for adding natural sweetness:
-
Fresh fruits: Chop up some ripe strawberries or peaches and mix them into your yogurt for a burst of fruity flavor.
-
Honey or maple syrup: Drizzle a small amount of honey or maple syrup over your bowl of plain yogurt and stir well.
-
Stevia: If you’re looking for an alternative low-calorie sweetener, try adding a few drops of liquid stevia extract.
Remember that each person’s taste preferences differ, so feel free to experiment until you find the perfect level of sweetness for your vanilla yogurt.
Evenly Distributing Vanilla Essence
To ensure that the vanilla flavor is evenly distributed throughout your homemade yogurt, follow these simple steps:
-
Start with a container of plain yogurt.
-
Add your desired amount of vanilla extract or beans to the yogurt.
-
Mix thoroughly until the vanilla essence is evenly incorporated.
If you’re using vanilla beans, make sure to scrape out all the tiny seeds and blend them well into the yogurt. This will help distribute the flavor more evenly and prevent any clumps of seeds from forming.
Personalized Taste Profiles
One of the joys of making homemade vanilla yogurt is being able to tailor it to your own taste preferences. By experimenting with different ratios of vanilla extract or beans, you can create a personalized flavor profile that suits you perfectly.
Try varying the amount of vanilla used in each batch until you achieve your desired taste. Start with smaller amounts and gradually increase if needed. Remember, a little bit of vanilla goes a long way, so start conservatively and add more as necessary.
Easy Vanilla Yogurt Recipe
Making homemade vanilla yogurt is easier than you think! With just a few simple steps, you can create a delicious batch of creamy yogurt infused with the aromatic flavors of vanilla. Whether you’re a seasoned yogurt maker or a beginner in the kitchen, this recipe will guide you through the process effortlessly.
A Straightforward Method
This vanilla yogurt recipe requires minimal ingredients and preparation time, making it an ideal choice for those seeking simplicity in their homemade creations. All you need is some plain yogurt as a base, along with vanilla and a vanilla bean to infuse that rich flavor. The rest is easy!
Customizable Sweetness and Creaminess
One of the best things about making your own vanilla yogurt is the ability to customize its sweetness and creaminess according to your taste preferences. You have full control over how much sweetness you want to add, whether it’s honey, maple syrup, or any other sweetener of your choice. Likewise, if you prefer a thicker consistency, feel free to adjust the amount of plain yogurt or strain it longer for extra creaminess.
Versatile Batch Sizes
Whether you’re looking to make a large batch of vanilla yogurt or just small portions for yourself, this recipe offers versatility in terms of quantity. If you have a big family or enjoy sharing your homemade goodies with friends, simply multiply the ingredients accordingly. On the other hand, if it’s just for personal consumption or experimentation purposes, feel free to scale down the measurements.
To summarize:
-
For larger batches: Increase all ingredient quantities proportionally.
-
For smaller portions: Decrease all ingredient quantities proportionally.
Step-by-Step Instructions
Now that we’ve covered the key points let’s dive into the step-by-step instructions for making your own homemade vanilla yogurt:
-
In a mixing bowl, combine plain yogurt with your desired sweetener (e.g., honey) and mix well.
-
Split open a vanilla bean and scrape out the seeds using a sharp knife. Add the seeds to the yogurt mixture.
-
Stir the yogurt mixture thoroughly to ensure the vanilla flavor is evenly distributed.
-
Cover the bowl with plastic wrap or a lid and let it sit at room temperature for about 6-8 hours, allowing the flavors to meld and the yogurt to thicken.
-
After the incubation period, transfer the bowl to the refrigerator and let it chill for at least 2 hours or until it reaches your desired consistency.
-
Once chilled, give your homemade vanilla yogurt a good stir before serving.
That’s it! You now have a batch of delicious homemade vanilla yogurt ready to be enjoyed on its own, topped with fresh fruits, or used in various recipes.
So why settle for store-bought when you can create your own creamy and flavorful vanilla yogurt at home? Give this easy recipe a try and savor every spoonful of your homemade creation!
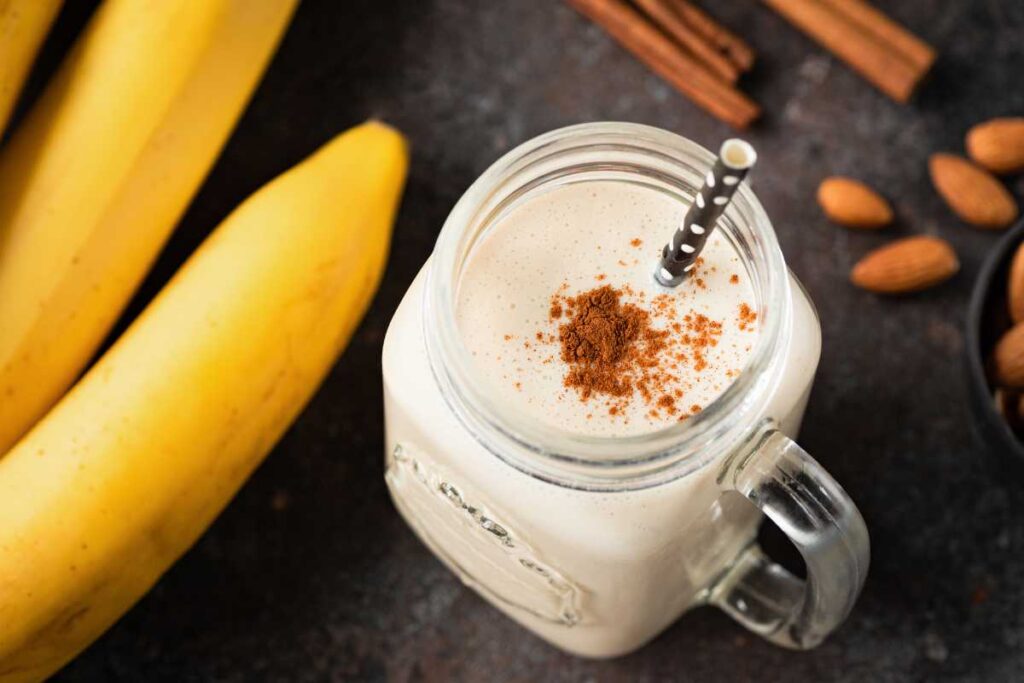
Remember: Experimenting with different variations of this recipe is encouraged. Don’t be afraid to add your personal touch by incorporating other flavors such as cinnamon or nutmeg. The possibilities are endless when it comes to customizing your very own homemade vanilla yogurt!
Storing Homemade Vanilla Yogurt
Master proper storage techniques to maintain freshness and extend the shelf life of your homemade vanilla yogurt. Learning about suitable containers and refrigeration temperature is crucial for storing your finished product. Finding out how long you can store homemade vanilla yogurt without compromising taste and quality will help you enjoy it for longer periods. Moreover, discovering tips to prevent separation or texture changes during storage ensures that your yogurt remains delicious.
Suitable Containers and Refrigeration Temperature
Choosing the right containers is essential. Opt for airtight containers or jars that seal tightly to prevent air exposure. This helps maintain the freshness and flavor of your yogurt while preventing any unwanted contamination.
The refrigerator plays a vital role in preserving the quality of your homemade vanilla yogurt. Set the temperature between 36-40°F (2-4°C) to ensure optimal storage conditions. Avoid placing the yogurt near the door where temperature fluctuations are more likely to occur.
Shelf Life and Storage Duration
Homemade vanilla yogurt can typically be stored in the refrigerator for up to two weeks without sacrificing its taste or texture. However, it’s best consumed within one week for peak freshness.
To keep track of when you made each batch, consider labeling your containers with dates using removable stickers or markers. This way, you can easily identify which ones need to be consumed first.
Preventing Separation or Texture Changes
During storage, it’s common for homemade vanilla yogurt to separate slightly or experience changes in texture due to natural processes. To minimize these effects:
-
Gently stir the contents before consuming if any separation occurs.
-
If desired, add fresh fruit or berries directly into individual serving portions rather than mixing them into the entire container beforehand.
-
When adding fruit toppings like fresh berries, do so just before eating rather than during initial preparation.
-
Avoid vigorous shaking or stirring as this may lead to unwanted texture changes.
By following these tips, you can ensure your homemade vanilla yogurt remains delicious and enjoyable throughout its storage duration.
Health Benefits of Homemade Vanilla Yogurt
Nutritional Advantages of Consuming Homemade Vanilla Yogurt
Homemade vanilla yogurt offers a plethora of nutritional advantages that make it a valuable addition to your diet. Packed with essential nutrients, it can contribute significantly to your overall well-being. One notable benefit is its high calcium content, which promotes strong bones and teeth. Homemade vanilla yogurt contains vitamins such as vitamin B12 and riboflavin, which are crucial for energy production and maintaining healthy skin.
Contribution to a Healthy Digestive System
Consuming homemade vanilla yogurt can have a positive impact on your digestive system. The natural probiotics present in this delightful dairy product help maintain the balance of good bacteria in your gut. These beneficial microorganisms aid in digestion and nutrient absorption while also supporting a healthy immune system. By incorporating homemade vanilla yogurt into your daily routine, you can promote regularity and alleviate common digestive issues like bloating or constipation.
Probiotics and Their Potential Health Benefits
Probiotics found in homemade vanilla yogurt offer numerous potential health benefits beyond digestion. These live cultures play a vital role in improving gut health by preventing harmful bacteria from flourishing. As a result, they may reduce the risk of certain gastrointestinal disorders such as irritable bowel syndrome (IBS) or inflammatory bowel disease (IBD). Furthermore, studies suggest that probiotics could enhance immune function and even alleviate symptoms of allergies or eczema.
Protein Content and Essential Nutrients
In addition to its probiotic properties, homemade vanilla yogurt boasts an impressive protein content that contributes to muscle growth and repair within the body. This makes it an excellent choice for individuals seeking post-workout recovery options or those looking to increase their protein intake without consuming excessive amounts of meat or other animal products.
Moreover, this nutritious dairy product contains several other essential nutrients necessary for maintaining optimal health. These include potassium, magnesium, phosphorus, and zinc, all of which play crucial roles in various bodily functions. Potassium, for instance, helps regulate blood pressure, while magnesium supports energy production and muscle function.
Conclusion
Congratulations! You are now a master of homemade vanilla yogurt. Armed with the essential equipment, knowledge of choosing the right milk and starter, and the secret to transforming plain yogurt into a delicious vanilla treat, you can easily whip up your own batch of creamy goodness.
With our easy vanilla yogurt recipe, you’ll be able to create a delectable snack or breakfast option in no time. And don’t worry about storing your homemade creation – we’ve got you covered with tips on how to keep it fresh and tasty.
Not only is homemade vanilla yogurt incredibly delicious, but it also comes with a range of health benefits. Packed with probiotics and essential nutrients, it’s a fantastic way to support your gut health and boost your overall well-being.
Now that you have mastered the art of making homemade vanilla yogurt, why not take it a step further? Experiment with different flavors and toppings to personalize your creations. Get creative with fruit compotes, granola, or even chocolate chips for an extra indulgent treat.
Remember,Practice makes perfect. Don’t be discouraged if your first batch isn’t exactly what you envisioned. Keep trying and refining your technique until you achieve the desired consistency and flavor.
So what are you waiting for? Grab your equipment, choose the right ingredients, follow our simple recipe, and start enjoying the incredible taste of homemade vanilla yogurt today!
FAQs
1. How long does homemade vanilla yogurt last?
Homemade vanilla yogurt can typically be stored in the refrigerator for up to two weeks. However, make sure to check for any signs of spoilage before consuming.
2. Can I use non-dairy milk alternatives to make homemade vanilla yogurt?
Absolutely! Non-dairy milk alternatives such as almond milk or coconut milk can be used instead of traditional dairy milk. Just make sure to choose unsweetened varieties for best results.
3. Can I use flavored yogurt as a starter for making vanilla yogurt?
While it is possible to use flavored yogurt as a starter, it may affect the final taste and consistency of your homemade vanilla yogurt. It’s best to start with plain yogurt and add your own vanilla flavoring.
4. Can I make Greek-style vanilla yogurt at home?
Yes, you can! To make Greek-style vanilla yogurt, simply strain the homemade yogurt using a cheesecloth or fine-mesh strainer to remove the whey liquid. This will result in a thicker and creamier texture.
5. Can I sweeten my homemade vanilla yogurt with honey or maple syrup?
Absolutely! If you prefer a sweeter taste, feel free to add honey or maple syrup to your homemade vanilla yogurt. Adjust the amount according to your personal preference.
6. Can I freeze homemade vanilla yogurt?
Yes, you can freeze homemade vanilla yogurt. However, keep in mind that freezing may alter the texture slightly. Thaw it in the refrigerator overnight before consuming.
7. Is homemade vanilla yogurt healthier than store-bought options?
Homemade vanilla yogurt allows you full control over the ingredients used, avoiding any unnecessary additives or preservatives commonly found in store-bought options. It’s a healthier choice for those looking for a natural and nutritious alternative.
Remember, have fun experimenting with flavors and enjoy the process of creating your own delicious homemade treats!