How to Grow Vanilla Orchid: Essential Tips for Harvesting Beans
Did you know that you can experience the pure delight of cultivating your own vanilla orchids right in your own backyard? Imagine the satisfaction of nurturing these exquisite plants and witnessing their beautiful blooms firsthand. Whether you’re a seasoned gardener or just starting out, learning how to grow vanilla orchids is an adventure worth embarking on for growers.

Vanilla orchids, loved by growers for their elegant flowers, require proper pollination to thrive. Understanding their unique growth patterns and the importance of aerial roots is crucial for successful cultivation. Achieving optimal bloom length involves careful waterings. This captivating journey into plant cultivation reveals the secrets behind cultivating these beautiful vines.
With our expert guidance, you’ll explore the wonders of nurturing vanilla orchids indoors in your very own home garden. No need for a greenhouse or extensive horticultural knowledge – we’ll show you how to create an ideal environment for these enchanting flowers to bloom. Get ready to unlock the hidden potential within your green thumb and delve into the fascinating realm of growing vanilla orchids vine.
So let’s dive in together and uncover why cultivating these delicate vanilla bean orchids, vanilla plants, and vanilla bean plants can be such a rewarding hobby. Get ready to witness nature’s artistry unfold before your eyes as you embark on this aromatic journey with us.
Choosing the Right Pot for Vanilla Orchids
Choosing the right pot is essential for the overall health and growth of your indoor vanilla orchids. The pot you select should provide proper drainage and allow sufficient air circulation around the roots of the plant. Here are some important factors to consider when choosing a pot for your vanilla orchids, including their flowers, pods, and overall health indoors.
Select a well-draining pot that allows air circulation for healthy root growth.
To ensure optimal root health indoors, it is crucial to choose a pot that provides excellent drainage for your vanilla orchids. These plants prefer slightly moist soil but dislike sitting in waterlogged conditions. Therefore, opt for pots with drainage holes at the bottom to allow excess water to escape easily. This will prevent waterlogging and potential root rot, which can be detrimental to the plant’s overall well-being. Using pots with proper drainage is especially important when growing orchids in pods or moss, as these materials can retain moisture. Additionally, consider adding a vine or trellis for your vanilla orchids to climb and grow.

Consider using clay or plastic pots based on your specific needs and climate conditions.
The choice between clay and plastic pots for indoor plants depends on various factors such as personal preferences, climate conditions, and the type of plant. Clay pots are porous, allowing better airflow to the roots of vines and preventing soil from becoming overly saturated. However, they tend to dry out more quickly than plastic pots, requiring more frequent watering. On the other hand, plastic pots retain moisture better but may not provide as much airflow as clay pots. Consider these factors when deciding which type of pot is best suited for your indoor vine plants like vanilla orchids.
Choose a pot size that accommodates the growth of your vanilla orchid plant.
As the vanilla orchid plant grows, it needs ample space for its roots to expand and spread out comfortably. When choosing a pot size, select one that allows room for future growth without being excessively large. A good rule of thumb is to choose a pot with a diameter approximately 1-2 inches larger than the current size of your vanilla orchid’s root ball. This will provide enough space for healthy root development while avoiding an unnecessarily oversized container that could lead to overwatering.
Opt for pots with drainage holes to prevent waterlogging and root rot.
Ensuring proper drainage is crucial for the well-being of your vanilla orchids, a plant known for its beautiful vine-like growth. Without adequate drainage, excess water can accumulate in the pot, leading to waterlogging and potentially causing root rot. Pots with drainage holes allow excess water to escape, preventing these issues and promoting healthy root growth for your vanilla orchid vine. If you come across a beautiful pot without drainage holes that you simply cannot resist, consider drilling or creating holes at the bottom yourself to ensure sufficient drainage for your vine plant.
How to Grow Vanilla Orchid | Optimal Conditions for Vanilla Orchid Growth
To ensure the successful growth of your vanilla orchids, it is crucial to provide them with the optimal conditions. Creating a suitable environment for these exquisite plants will promote healthy growth and abundant flowering. Let’s explore some key factors to consider when cultivating these vine plants.
Bright, Indirect Light
One of the essential requirements for vanilla orchids is bright, indirect light. These plants thrive in filtered sunlight rather than direct exposure. Placing them near a north or east-facing window can provide the ideal lighting conditions. If natural light is limited, you may consider using artificial grow lights specifically designed for orchids.
Temperature Range
Maintaining a consistent temperature range between 60°F and 80°F (15°C – 27°C) is vital for optimal vanilla orchid growth. These tropical plants prefer warm environments but can tolerate slight fluctuations within this range. Avoid exposing them to extreme temperatures or drafts that could harm their delicate foliage.
Proper Ventilation
Good air circulation around your vanilla orchids is crucial to prevent stagnant air and potential issues such as mold or fungal diseases. Ensure there is adequate ventilation in the room where your plants are located. You can achieve this by placing a small fan nearby on low speed or opening windows periodically to allow fresh air to circulate.

Humidity Control
Vanilla orchids require high humidity levels to thrive successfully. In their natural habitat, they benefit from humid rainforests. To replicate this environment, misting the leaves regularly with water can help increase humidity levels around the plants. Alternatively, you can place trays filled with water near your orchids to create a humid microclimate.
Additional Tips
-
It’s advisable not to place vanilla orchids near heating vents or air conditioning units as they can cause sudden temperature changes for the plant.
-
Avoid exposing your vanilla bean orchids, also known as vanilla planifolia, to cold drafts from open windows during winter months.
-
Consider using a hygrometer to monitor humidity levels for your vanilla plants, including vanilla bean plants and vanilla bean orchids, to ensure they stay within the optimal range for the growth and production of vanilla extract.
-
If your home has dry air, you can also use a humidifier to maintain adequate moisture around your vanilla plants and vanilla bean plants.
By providing your vanilla orchids with optimal conditions such as bright, indirect light, suitable temperature range, proper ventilation, and controlled humidity, you can ensure healthy growth and abundant flowering of these exquisite plants. Remember to closely monitor their progress and make adjustments as needed. With patience and care, you can enjoy the beauty of these exquisite orchids in your own home.
Essential Care Tips for Healthy Vanilla Bean Orchids
Taking care of vanilla bean orchids is essential to ensure healthy growth and a bountiful harvest. Here are some key tips to help you successfully cultivate these fragrant and valuable plants.

Prune Regularly to Encourage Branching and Prevent Overcrowding
Regular pruning is crucial for vanilla bean orchids as it promotes branching, prevents overcrowding, and ensures better air circulation. To prune your orchid, start by identifying any dead or dying stems or branches. Using clean and sharp pruning shears, carefully remove these damaged parts. Trim back any long vines that have become unruly or tangled. Pruning not only helps maintain the plant’s shape but also stimulates new growth and enhances overall health.
Use a Balanced Fertilizer Formulated Specifically for Orchids During the Growing Season
To provide your vanilla bean orchids with essential nutrients, use a balanced fertilizer specifically formulated for the plant during the growing season. This will support their development and encourage robust flowering. Look for fertilizers with an equal ratio of nitrogen (N), phosphorus (P), and potassium (K) such as 20-20-20 or 14-14-14. Apply the fertilizer according to the package instructions, usually every two weeks during active growth periods.
Support Climbing Vines with Stakes or Trellises as They Grow Taller
Vanilla bean orchids are climbing plants that require support as they grow taller. To prevent them from toppling over or becoming entangled in other nearby plants, provide sturdy stakes or trellises for them to cling onto. As your orchid vine starts to climb, gently guide it towards the support structure using soft ties or twine. This will help create a stable framework for the plant while allowing it to reach its full potential height.
Monitor Leaf Color and Adjust Nutrient Levels Accordingly
The color of your vanilla bean orchid’s leaves can provide valuable insights into its health and nutrient requirements. Healthy leaves should be a vibrant green color. If you notice any discoloration or yellowing, it may indicate a nutrient deficiency or other underlying issue. Adjust the nutrient levels accordingly by either increasing the frequency of fertilization or using a specialized orchid fertilizer that addresses specific deficiencies. Regularly monitoring leaf color will help you maintain optimal nutrition for your plants.
By following these essential care tips, you can ensure the healthy growth and thriving of your vanilla bean plant. Remember to prune regularly, use balanced orchid fertilizer for your plant, provide support for climbing vines on your plant, and monitor leaf color for any necessary adjustments. With proper care, you’ll soon be rewarded with beautiful blooms and the delightful aroma of fresh vanilla from your very own vanilla bean plant.
Watering Techniques and Maintaining Ideal Humidity Levels
Watering plants, especially vanilla orchids, requires a delicate balance to ensure their optimal growth and health.
Water vanilla bean plants thoroughly but allow the soil of the vanilla plants to dry slightly between watering sessions.
Proper watering is crucial for the well-being of vanilla orchids. These plants prefer a consistent level of moisture in their root zone but do not thrive in constantly wet conditions. To strike the right balance, water your vanilla orchids thoroughly until water drains out from the bottom of the pot. This ensures that all roots receive sufficient hydration.
After watering the vanilla bean orchids, it’s important to let the soil dry slightly before the next session. This prevents overwatering and helps prevent problems like root rot that can arise from excessive moisture. A simple way to determine if it’s time to water the vanilla bean orchids again is by gently sticking your finger about an inch into the soil; if it feels dry at that depth, it’s time for another round of watering.
Avoid overwatering vanilla bean orchids, which can lead to root rot and other issues.
Overwatering is one of the most common mistakes made when caring for vanilla orchids. These plants are susceptible to root rot when their roots remain consistently damp or submerged in excess water. To avoid this problem, always ensure proper drainage by using well-draining soil mixed with materials like sphagnum moss or perlite.
Be mindful not to leave standing water in saucers or trays beneath the pots as this can create a stagnant environment where pathogens thrive. Remember, it’s better to underwater than overwater your vanilla orchids as they are more tolerant of slight drought conditions.
Maintain humidity levels between 50% – 70% for your vanilla bean orchids through various methods like misting or using humidifiers near the plant’s location.
Vanilla orchids thrive in high humidity environments, mimicking their natural habitat. Maintaining humidity levels between 50% – 70% is essential for their healthy growth and blooming. Achieving this range can be done through various methods:
-
Misting: Regularly misting the leaves and aerial roots of your vanilla orchids can help increase humidity levels around them. Use a fine mist spray bottle and ensure that the water droplets are small enough not to cause waterlogging.
-
Humidifiers: Placing humidifiers near your orchids can provide a constant source of moisture in the air, ensuring steady humidity levels within the desired range.
Provide good air circulation while avoiding excessive drafts.
While maintaining high humidity is important, it’s equally crucial to provide good air circulation for vanilla orchids. Proper airflow helps prevent stagnant conditions that can lead to fungal or bacterial issues. However, avoid placing your plants in areas with excessive drafts as they can cause stress or damage.
To strike a balance between air circulation and avoiding drafts, consider placing your vanilla orchids near an open window with indirect sunlight or use fans to gently circulate the air without subjecting them to strong gusts.
By following these watering techniques and maintaining ideal humidity levels, you’ll create an environment where your vanilla orchids can flourish.
Preventing Pests and Diseases in Vanilla Orchid Plants
Taking care of vanilla orchids involves more than just providing the right growing conditions. To ensure their health and productivity, it is essential to prevent pests and diseases from infesting your plants. Here are some effective measures you can take:
Regular Inspection, Cleaning, and Quarantine
Regularly inspecting your vanilla orchids is crucial for identifying any potential pest or disease issues early on. Examine the leaves, stems, and roots carefully for signs of infestation or damage. If you notice any abnormalities like discoloration, spots, or wilting, take immediate action.
Regularly cleaning your vanilla bean orchid plants helps remove dust, debris, and potential hiding places for pests. Gently wipe the leaves of the vanilla bean orchid with a damp cloth to keep them clean and free from pests like spider mites.
When introducing new plants, such as the vanilla bean orchid, to your collection, it is important to quarantine them first. This practice prevents the spread of pests or diseases that may have hitchhiked on the new arrivals. Keep the quarantined plants separate from your existing ones for at least a few weeks while closely monitoring their condition.
Monitoring for Common Pests
Spider mites, aphids, and mealybugs are common pests that can plague vanilla orchids if left unchecked. Regular monitoring allows you to detect these critters early before they cause significant damage.
Inspect the undersides of leaves where spider mites often hide, especially on the vanilla bean orchid. Look out for tiny webs or stippling marks on the foliage—a sign that these pesky creatures are present.
Aphids can be found clustered on young shoots or underneath leaves of the vanilla bean orchid. They suck sap from the plant tissues and excrete honeydew, which attracts ants.
Mealybugs, a common pest in orchids, appear as small cotton-like masses along leaf axils or hidden in crevices near leaf bases. Their feeding weakens orchid plants over time.
Prompt Pest Infestation Treatment
If you spot any pest infestations on your vanilla orchids, it’s crucial to take action promptly. Depending on your preference and the severity of the infestation, you can choose between organic or chemical solutions.
Organic options for treating pests on orchids include insecticidal soaps, neem oil sprays, or homemade remedies like a mixture of water and dish soap. These treatments are effective against a range of orchid pests without harming the environment.
Chemical solutions such as pyrethroids or systemic insecticides may be necessary for severe orchid infestations. Always follow the instructions carefully and use them sparingly to minimize any potential negative impact on your orchids.
Preventing Fungal Diseases
Overwatering is a common mistake that leads to fungal diseases like root rot in vanilla orchids. It is essential to strike a balance between providing enough moisture for growth and avoiding excessive watering.
To prevent root rot in orchids, ensure proper drainage by using well-draining potting mix. Allow the top inch of orchid soil to dry out before watering the orchid again. Avoid letting water stagnate in saucers or trays beneath orchid pots.
In addition to proper watering practices, maintaining good air circulation around your plants can help reduce fungal disease risks. Avoid overcrowding your vanilla orchids and provide adequate spacing between them.
By implementing these preventive measures—regular inspection, monitoring for pests, prompt treatment of infestations, and preventing fungal diseases—you can keep your vanilla orchids healthy and thriving.
Harvesting and Utilizing Homegrown Vanilla Beans
Growing vanilla orchids can be a rewarding experience, especially when it comes time to harvest and utilize the delicious vanilla beans.
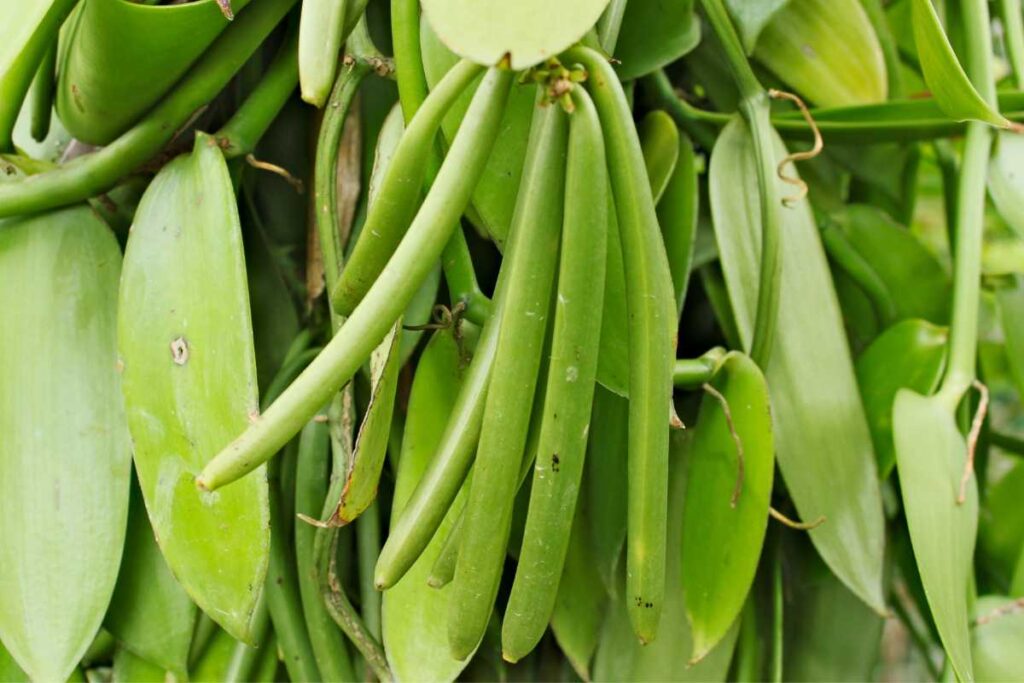
Harvesting Vanilla Beans
When your vanilla bean plants, including the orchid species, have matured and produced bean pods, it’s time to start thinking about harvesting. The key is to wait until the beans turn yellow and plump, indicating that they are fully ripe. At this stage, they are bursting with flavor and aroma. Gently twist each bean pod off the vine, being careful not to damage the surrounding plant.
Curing Vanilla Beans
Once you have harvested your precious vanilla beans, it’s essential to properly cure them to enhance their flavor and aroma. Curing involves several steps: blanching, fermenting, drying, and conditioning the orchid.
-
Orchid Blanching: Begin by blanching the freshly harvested orchid beans in boiling water for a quick 2-3 minutes. This helps stop any further enzyme activity that may affect their quality.
-
Fermenting: After blanching the orchid beans, place them in a clean towel or cloth bag and keep them in a warm area (around 120°F) for about 48-72 hours. During this fermentation process, the beans develop their characteristic vanilla fragrance.
-
Drying: Once fermented, spread out the beans on a clean surface or wire rack in a well-ventilated area away from direct sunlight. Allow them to dry naturally for approximately two weeks until they become dark brown and leathery.
-
Conditioning: Finally, transfer the dried vanilla beans into an airtight container for conditioning. Store them in a cool, dark place for at least one month before using them to allow their flavors to mellow and develop further.
Storing Cured Vanilla Beans
To ensure the longevity of your cured vanilla beans, proper storage is crucial. Follow these guidelines:
-
Place the conditioned beans in airtight containers to prevent moisture and air exposure.
-
Store them in a cool, dark place away from direct sunlight, such as a pantry or cupboard.
-
Avoid storing them near strong-smelling substances as vanilla easily absorbs odors.
-
Check on your stored vanilla beans periodically to ensure they remain dry and free from mold or pests.
Utilizing Homegrown Vanilla Beans
Now that you have successfully harvested and cured your homegrown vanilla beans, it’s time to put them to good use! Here are some exciting ways to incorporate their delightful flavors into your culinary creations:
-
Enhance desserts: Add a touch of homemade vanilla extract or scrape out the tiny seeds from the bean pods to infuse desserts like cakes, cookies, ice creams, and custards with rich vanilla flavoring.
-
Elevate beverages: Create deliciously fragrant coffee syrups or infuse milk for hot chocolate with a whole vanilla bean pod. You can also make your own homemade vanilla-flavored liqueurs by steeping the beans in alcohol.
-
Experiment with savory dishes: Believe it or not, vanilla can add depth and complexity to savory dishes too!
Conclusion
Mastering Vanilla Orchid Care is essential for successfully growing and harvesting your own vanilla beans. By following the right techniques and providing optimal conditions, you can ensure the health and productivity of your orchids.
Choosing the right pot is crucial for the growth of vanilla orchids. Opt for a well-draining pot that allows air circulation around the roots. This will prevent waterlogging and root rot, which can be detrimental to the plants’ health.
Creating optimal conditions is another key aspect of vanilla orchid care. These plants thrive in warm temperatures, high humidity, and bright but indirect light. Mimicking their natural habitat will promote healthy growth and increase the chances of successful bean production.
To keep your vanilla bean orchids healthy, it’s important to provide essential care tips such as regular fertilization with a balanced formula, pruning to encourage branching, and providing support for climbing vines. These practices will help maintain strong and vibrant plants.
Watering techniques play a vital role in keeping vanilla orchids hydrated without causing waterlogging. Water thoroughly when the top inch of soil feels dry to the touch, but avoid overwatering as it can lead to root rot. Maintaining ideal humidity levels by misting or using a humidifier ensures proper growth.
Preventing pests and diseases is crucial for safeguarding your vanilla orchid plants. Regularly inspect them for signs of infestation or disease, such as yellow leaves or sticky residue on foliage. Promptly address any issues with organic pest control methods or appropriate treatments to protect your precious crop.
Once your vanilla beans are ready for harvest, make sure you know how to properly utilize them at home. The curing process involves drying and fermenting the beans to develop their distinct flavor profile fully. With patience and attention to detail during this final stage, you can enjoy homemade vanilla extract or use whole beans in various culinary creations.
In conclusion, mastering Vanilla Orchid Care allows you to grow and enjoy your own homegrown vanilla beans. By choosing the right pot, providing optimal conditions, practicing essential care tips, maintaining ideal humidity levels, preventing pests and diseases, and properly harvesting and utilizing the beans, you can experience the satisfaction of cultivating this exotic and valuable spice.
Start your journey into growing vanilla orchids today and savor the rewards of a successful harvest!
FAQs
Q: How long does it take for vanilla orchids to produce beans?
Vanilla orchids typically start producing beans after three to five years of growth. Patience is key when growing these plants as they require time to mature before they begin bearing fruit.
Q: Can I grow vanilla orchids indoors?
Yes, you can grow vanilla orchids indoors as long as you provide them with the right conditions. Ensure they receive adequate bright but indirect light, maintain proper humidity levels, and follow the recommended care guidelines for indoor cultivation.
Q: Do I need to hand-pollinate my vanilla orchid flowers?
In their natural habitat, vanilla orchid flowers are pollinated by specific bees or hummingbirds. However, for indoor cultivation or in areas without these pollinators, hand-pollination may be necessary. Gently transfer pollen from one flower to another using a small brush or cotton swab.
Q: How often should I fertilize my vanilla orchids?
Fertilize your vanilla orchids every two weeks during active growth using a balanced fertilizer specifically formulated for orchids. Dilute the fertilizer according to package instructions and apply it directly to the soil around the plant’s roots.
Q: Can I grow vanilla orchids from seeds?
While it is possible to grow vanilla orchids from seeds, it is a lengthy process that requires patience and expertise. It is more common for growers to propagate these plants through stem cuttings or tissue culture methods for faster results.
Q: What are common pests that affect vanilla orchids?
Some common pests that may affect vanilla orchids include aphids, mealybugs, spider mites, and thrips. Regularly inspect your plants for signs of infestation and promptly treat affected areas with organic pest control methods or appropriate insecticides.
Q: How do I know when my vanilla beans are ready to be harvested?
Vanilla beans are typically ready for harvest when they have reached their full length, turn yellowish-green in color, and begin to split at the end opposite the stem.